發表文章

目前顯示的是 2020的文章

Tips for using imu_utils for imu calibration

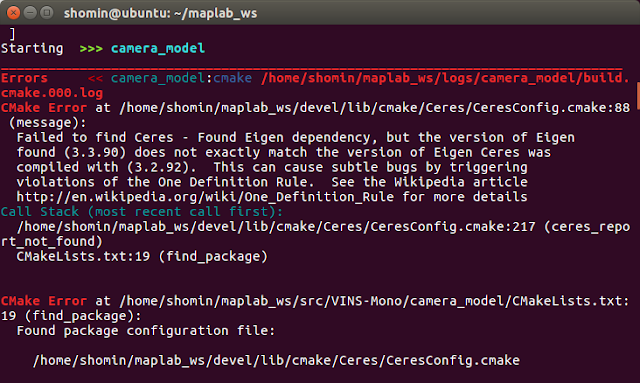
1. Install Ceres * Dependencies: $ sudo apt-get install liblapack-dev libsuitesparse-dev libcxsparse3.1. 4 libgflags-dev $ sudo apt-get install libgoogle-glog-dev libgtest-dev * Eigen version should be newer than 3.3.4. * Download the version  ceres-solver-1.14.0.tar.gz directly. 2. Build code_utils * Dependency: sudo apt-get install libdw-dev * Build the source code in the ROS_WORKSPACE * Modify file: catkin_ws/src/code_utils/src/ sumpixel_test.cpp #include "backward.hpp" ->  #include “code_utils/backward.hpp” 3. Build imu_utils * Build the source code in the ROS_WORKSPACE 4. Run the calibration * Create your own .launch file. (assign the topic name, time duration ...) *  roslaunch imu_utils XXX.launch first and then rosbag play -r 200 XXX.bag ***Don't forget to source setup.bash file ! Reference: [1]  https://github.com/gaowenliang/imu_utils [2]  https://zhuanlan.zhihu.com/p/151675712 [3]  https://blog.csdn.net/qq_41586768/article

[Solved] TypeError: Conversion is only valid for arrays with 1 or 2 dimensions. Argument has 3 dimensions......

In file "/var/kalibr-build/src/kalibr/aslam_offline_calibration/kalibr/python/kalibr_common/ ImageDatasetReader.py Modify: img_data = np.array(self.CVB.imgmsg_to_cv(data)) To: img_data = np.squeeze(np.array(self.CVB.imgmsg_to_cv2(data, "mono8"))) Reference: [1]  https://github.com/ethz-asl/kalibr/issues

Solutions for reported errors while building "BagFromImages"

1. $ROS_PACKAGE_PATH command not found Method: build the source code in a catkin workspace as follows. $ cd ~/catkin_ws $ cd src $ git clone https://github.com/raulmur/BagFromImages.git BagFromImages $ cd BagFromImages $ mkdir build $ cd build $ cmake .. $ make 2. undefined reference to symbol '_ZN14console_bridge3logEPKciNS_8LogLevelES1_z' /usr/lib/x86_64-linux-gnu/libconsole_bridge.so: error adding symbols: DSO missing from command line Method:  libconsole_bridge should be linked in CMakeLists.txt. ex: target_link_libraries (${PROJECT_NAME} console_bridge) Reference: [1]  https://github.com/raulmur/BagFromImages [2]  https://www.cnblogs.com/sparkzxw/p/6501730.html [3]  https://github.com/raulmur/BagFromImages/issues/5

Tips for building ICE-BA on Banana Pi M3

圖片
OpenCV installation 0. Build M3 Bsp code for installing cross-compile tool  $ git clone https://github.com/BPI-SINOVOIP/BPI-M3-bsp.git $ cd BPI-M3-bsp $ mkdir -p linux-sunxi/output/lib/firmware $ sudo ./build.sh Then choose building kernel only: mode 3  1. Use cmake-gui to configure and generate makefile. (1) CMAKE_BUILD_TYPE: Release (2) CMAKE_EXE_LINKER_FLAGS: -lpthread( or pthread) -lrt -ldl (Manually modify this part in CMakeCache.txt file) * Also remember to modify file : common.cc [1] (3) CMAKE_INSTALL_PREFIX: /usr/local (4) OPENCV_GENERATE_PKGCONFIG: True (5) OPENCV_EXTRA_MODULE_PATH: ~/opencv4.3.0/opencv_contrib-4.3.0/modules (6) BUILD_ZLIB: True (7) ZLIB_INCLUDE_DIR: ~/opencv4.3.0/3rdparty/zlib (8) CMAKE_C_FLAGS: -O3 -fPIC (9) CMAKE_CXX_FLAGS: -O3 -fPIC * Command line: sudo cmake .. -DCMAKE_BUILD_TYPE=Release -DCMAKE_INSTALL_PREFIX=/usr/local -DOPENCV_GENERATE_PKGCONFIG=On -DOPENCV_EXTRA_MODULE_PATH=../opencv_contrib-3.4.3/modules/ -DB

Burn linux image to eMMC storage on Banana Pi M3

1. Download linux image and install image on a TF card. 2. Insert the TF card into M3, and press power button setup M3. 3. Clone the running ubuntu from the TF card to the eMMC. $ sudo dd if=/dev/mmcblk0 of=/dev/mmcblk1 bs=10MB status=progress 4. Poweroff M3, remove the SD, power it on again, and you should be good to go… *Command for wiping emmc disk: $ sudo dd if=/dev/zero of=/dev/mmcblk1 status=progress *Remember to allocate the storage space of SD card before inserting the board. (Windows: minitool partition wizard) Reference: [1]  http://wiki.banana-pi.org/Banana_Pi_BPI-M3#Image_Release [2]  http://forum.banana-pi.org/t/bpi-m3-how-to-burn-linux-images-to-emmc-storage-on-your-bpi-m3/1214 [3]  http://wiki.banana-pi.org/Getting_Started_with_M3#Development_For_Linux [4]  http://forum.banana-pi.org/t/how-to-wipe-emmc-disk/1276 [5]  https://gxiangco.gitbook.io/moodlebox-on-banana-pi/chapter6 [6]  https://www.techwalla.com/articles/how-to-mount-an-sd-card-in-linux

Convert rosbag topic to image

1. Setup $ sudo apt-get install ros-kinetic-image-view $ roscd image_view $ rosmake image_view $ sudo apt-get install mjpegtools 2. Create a roslaunch file (ex: export.launch) with following content and put your bag file in the path: /opt/ros/kinetic/share/image_view <launch>           <node pkg="rosbag" type="play" name="rosbag" required="true" args="$(find image_view)/ test.bag (your bag file name) "/>           <node name="extract" pkg="image_view" type="extract_images" respawn="false" required="true" output="screen" cwd="ROS_HOME"> <remap from="image" to=" /camera/image_raw (your topic name) "/>           </node> </launch> 3. Exporting images $ roslaunch export.launch 4. Copy exported images to the directory you want $ ~cd $ mkdir image_data $ mv ~/.ros/frame*.jpg image_data/

Configuration for running ICE-BA on VIM3 Pro

VIM3 Pro 1. Download Ubuntu image [1] * Version 4.9 is a relatively stable version through testing. 2. Create a Booting Card for VIM3 [3] 3. Insert the card into the SD-Card slot on your VIM3. 4. Connect the USB-C & HDMI cables, and VIM will power-on automatically. 5. Place your VIM3 into Upgrade Mode to complete your Firmware upgrade. [4] * Recommend: Upgrade via a USB-C Cable. [5] * Always remember to connect HDMI cable and USB3.0 cable after VIM3 has correctly booted up.  * Create the SD card partition using NTFS format, and then use it as a external storage. (Mini tool will be helpful.) Build ICE-BA 1. Follow [6] to install boost, Eigen, Gflags, Glog, Yaml, brisk. * libtool should be installed before installing Glog. $ sudo apt-get update -y $ sudo apt-get install -y libtool * Modify the content of CMakeLists.txt before compiling Yaml as following. set(yaml_c_flags ${CMAKE_C_FLAGS}) =>  set(yaml_c_flags "${CMAKE_C_FLAGS} -fPIC" ) set(yaml_cxx

Running ROVIO

1. Installation (1) ROS (2) kindr $ git clone  https://github.com/ethz-asl/kindr $ mkdir build $ cd build  $ cmake ..  $ sudo make install (3) lightweight_filtering $ mkdir -p ~/workspace_rovio/src $ cd ~/workspace_rovio $ catkin_make $ cd src $ git clone https://github.com/ethz-asl/rovio.git $ cd rovio $ git submodule update --init --recursive  2. Compile $ cd ~/workspace_rovio $ catkin_make rovio --cmake-args -DCMAKE_BUILD_TYPE=Release -DMAKE_SCENE=ON $ catkin_make 3. Testing *Modify the bagfile path in rovio_rosbag_node.launch $ roscore $ cd ~/workspace_rovio $ source devel/setup.bash $ roslaunch rovio rovio_node.launch $ rosbag play "bagfile path" Reference: [1]  https://github.com/ethz-asl/rovio [2]  https://github.com/ethz-asl/kindr [2]  https://www.cnblogs.com/Jessica-jie/p/6607719.html

Keypoints for building msckf_mono

1. Requirements (1) ROS Kinetic (2) OpenCV (3) Boost (4) Eigen (5) fast $ git clone https://github.com/uzh-rpg/fast $ cd fast $ mdkir build $ cd build $ cmake .. $ make 2. Compile $ cd ANY_PATH $ mkdir catkin_ws  $ cd catkin_ws  $ mkdir src $ cd src   $ git clone https://github.com/daniilidis-group/msckf_mono $ cd ANY_PATH/catkin_ws  $ catkin_make  $ source devel/setup.bash *Solution for the fatal error:  msckf_mono/StageTiming.h: No such file or directory [2] Reference: [1]  https://github.com/daniilidis-group/msckf_mono [2]  https://github.com/daniilidis-group/msckf_mono/issues/21 [3]  csdn blog

Running ICE-BA

1. Installation (1) boost $ sudo apt-get install libboost-dev libboost-thread-dev libboost-filesystem-dev (2) Eigen $ sudo apt-get install libeigen3-dev (3) Gflags $ git clone https://github.com/gflags/gflags $ mkdir build $ cd build $ cmake .. -DBUILD_SHARED_LIBS=ON -DBUILD_STATIC_LIBS=ON -DBUILD_gflags_LIB=ON $ make -j2 $ sudo make install (4) Glog $ git clone https://github.com/google/glog $ export LDFLAGS='-L/usr/local/lib' $ ./autogen.sh $ ./configure  $ make -j2  $ sudo make install (5) OpenCV [3] $ cd ~ $ wget -O opencv.zip https://github.com/Itseez/opencv/archive/4.3.0.zip $ unzip opencv.zip $ cd opencv $ wget -O opencv_contrib.zip https://github.com/Itseez/opencv_contrib/archive/4.3.0.zip $ unzip opencv_contrib.zip $ mkdir build $ cd build $ cmake .. -DCMAKE_BUILD_TYPE=Release -DCMAKE_INSTALL_PREFIX= /usr/local -D OPENCV_GENERATE_PKGCONFIG=ON -DOPENCV_EXTRA_MODULES_PATH=../opencv_contrib-4.3.0/modules $ make -j2 $ sudo mak

Run VINS-Mono and save its result as a .tum output for evo analysis

圖片
1. Install prerequisites [1] *Solution for the eigen installation problem: reinstall eigen $ git clone https://gitlab.com/libeigen/eigen.git ... ... $ sudo make install *check current eigen version: $ pkg-config --modversion eigen3 (3.2.2 or later strongly recommended, 3.1.0 or later required.) 2. Build VINS-Mono on ROS *Remember  to recompile Ceres with the same Eigen version as you plan to use in the VINS-mono project. In my case, since the Ceres was compiled once in the maplab project with different Eigen version, a problem with the Eigen version confliction was reported as following picture. Solution: assign the desired Eigen path and recompile maplab ( $ catkin build maplab) After solving the problem mentioned above, you should be good to go... cd ~/catkin_ws/src git clone https://github.com/HKUST-Aerial-Robotics/VINS-Mono.git cd ../ catkin_make source ~/catkin_ws/devel/setup.bash 3. Run VINS-Mono using EuRoC dataset $ roslaunch vins_e

Analytical tool for VIO perfromance: evo

圖片
1. Install evo in the virtual environment [1] 2. Prepare the ground-truth data  Supported trajectory formats: 'TUM' trajectory files 'KITTI' pose files 'EuRoC MAV' (.csv groundtruth and TUM trajectory file) [2] ROS bagfile with: geometry_msgs/PoseStamped, geometry_msgs/TransformStamped, geometry_msgs/PoseWithCovarianceStamped or nav_msgs/Odometry topics 3. Plot ground-truth $ workon evaluation ( start evo ) $ evo_traj euroc data.csv --save_as_tum ( euroc => tum )  * There is no necessary to substract the original offset by yourself, just add "--align" in the command. $ evo_traj tum data.tum -p (tum format) $ deactivate ( stop evo ) 4. Generate trajectory data (ex: maplab) (1) Run VIO mode (2) load map in the maplab_console (3) Export .csv file ex: $ csv_export --csv_export_path '/home/shomin/maplab_ws/bagfiles/save_folder_0' (4) Open vertices.csv , delete first column and row, and save as a new file. (5) Trans

maplab(3) - Localization mode

1. Preparing a localization map source ~/maplab_ws/devel/setup.bash  roscore& rosrun rovioli tutorial_euroc save_folder_loc_map MH_01_easy.bag --optimize_map_to_localization_map save_folder_loc_map: save path of VI map optimize_map_to_localization_map : flag for creating optimized localization map * A folder named " save_folder_loc_map_localization " will be created in this process. 2. Running ROVIOLI with localization source ~/maplab_ws/devel/setup.bash roscore& rosrun rovioli tutorial_euroc_localization save_folder_loc_map_localization save_map_with_localization MH_02_easy.bag tutorial_euroc_localization: localization script save_folder_loc_map_localization:  reference map for localization MH_02_easy.bag:  A dataset to run, where a live source can also be used. 3. Visualization during ROVIOLI with localization [2] Useful topics: # Pose graph  /vi_map_baseframe  /vi_map_landmarks  /vi_map_vertices  /vi_map_edges/viwls  #

Test of ORB-SLAM2 using Realsense R200

圖片
1. Follow the official instruction to download and build ORB-SLAM2 . [1] *Modify the build option: make -j -> make -j4 or make -j2 if your device doesn't have enough CPU numbers. 2. Prepare the .yaml file of the RGB camera (1) Create a new .yaml file (Copy from other .yaml) (2) Do camera calibration and fill the result in it. (or find these parameters using RealSense SDK [2]) 3. Modify the default subscribed topic of RGB-D node and then redo ./build_ros.sh /camera/depth_registered/image_raw -> /camera/depth/image_raw 4. Run $ roscore $ roscd realsense_camera/launch/ $ roslaunch realsense_camera r200_nodelet_rgbd.launch $ rosrun ORB_SLAM2 RGBD [path of ORBvoc.txt] [path of .yaml file] * You can also create a .launch file in the ORB_SLAM2 package, and then $ roscd ORB_SLAM2/launch/ $ roslaunch XXX.launch *Environmental configuration [3] *Method for solving the build errors [4] *Publish the pose data [5] *Check the relationship between topi

Auto flight using a Qualcomm Snapdragon Flight platform (6) - Qualcomm Navigator API examples

圖片
1. Installation $ git clone https://github.com/ATLFlight/snav_api_examples.git $ adb shell "mkdir -p /home/linaro/examples" $ adb push snav_api_examples /home/linaro/examples $ adb shell $ make     2. Running the examples - basic $ start snav (Blue LED will blink) $ ./snav_read_attitude (prints the roll, pitch, and yaw angles) $ ./snav_send_esc_commands_keybaord (spin the motors, and control the motor signals through keyboard command) 3. Running the example - advanced (Using Qualcomm Navigator simulator) $ adb shell $ cd /home/linaro $ git clone https://github.com/ATLFlight/snav_fci.git (target should be switched to station mode beforehand) $ cd snav_fci $ mkdir build $ cd build $ cmake .. $ make -j4 (Open a new command window) $ sudo stop snav $ sudo snav -w 1000 (start simulation environment) (Open a new command window) $ snav_inspector (For observe the live simulated results) $ cd /home/linaro/snav_fci/build/bin $ ./XXX (XXX

Auto flight using a Qualcomm Snapdragon Flight platform (4-2) - MV SDK Camera streaming

1. Setting (1) Stop Snav $ sudo stop snav (2) Run imu_app in the background $ imu_app & 2. Capture images (1)  Create a saving images folder under /home/linaro (Default directory) $ mkdir -p /home/linaro (2) Capture cd ~/ mvCapture -r (hi-res camera) mvCapture -s (stereo camera) mvCapture -o (optical flow camera) 3. Copy image to the host $ adb pull /home/linaro/Record/monoCamera/frame_00000.grayscale.pgm <hostdirectory>

Auto flight using a Qualcomm Snapdragon Flight platform (5) - Navigator SDK

圖片
0. Licensing (IMPORTANCE!) $ adb push snapdragon-flight-license.bin /opt/qcom-licenses/ $ adb shell sync 1. Instllation $ adb shell mkdir -p /data/bin $ adb push snav_1.2.59_8x96.ipk /data/bin $ adb shell opkg install /data/bin/snav_1.2.59_8x96.ipk $ adb shell /etc/snav/enable_snav.sh 2. Configuring Runtime Parameters and run $ vi /usr/lib/rfsa/adsp/200qc_runtime_params.xml Changes configure the hardware for a 3s Lipo Battery. $ adb shell ln -s /usr/lib/rfsa/adsp/200qc_runtime_params.xml /usr/lib/rfsa/adsp/snav_params.xml $ adb shell start snav 3. Sensor Calibration $ cd ~/ snav_calibration_manager -s (Static calibration) $ cd ~/ snav_calibration_manager -t 5 (Thermal calibration) * PX4 is not supported on the 820Pro dev kit. Reference: [1]  https://tech.intrinsyc.com/projects/qualcomm-flight-pro-development-kit/wiki/navigator_sdk [2] Qualcomm® Navigator™ SDK User Guide for APQ8x96 (80-P4698-22 Rev. A ), January 4, 2019

RICOH THETA S camera - getting start with ROS

1. Install dependencies $sudo apt-get update $sudo apt-get install ros-<distro>-usb-cam 2. Turn on device with live streaming mode [1] 3. Create a ROS workspace with source files and build $ mkdir -p ~/RICOH/src $ cd ~/RICOH/ $ catkin_make $ cd src $ git clone https://github.com/ntrlmt/theta_s_uvc $ cd ../dev $ souece setup.bash   4. Check device port and run $ ls /dev/video* $ roslaunch theta_s_uvc theta_s_uvc_start.launch device:=/dev/video0 enable_image_view:=true 5. Display $ rosrun rqt_image_view rqt_image_view $ rosrun rviz rviz Reference: [1] https://support.theta360.com/ja/manual/s/content/streaming/streaming_01.html [2] http://zhaoxuhui.top/blog/2019/10/20/ros-note-8.html

Auto flight using a Qualcomm Snapdragon Flight platform (4-1) - ROS Camera streaming

圖片
1. Build the camera streaming application within Docker ROS (1) Create a new workspace cd $HOME (Docker home: refer to docker container ) mkdir -p ros/src && cd ros/src catkin_init_workspace cd ../ source /opt/ros/indigo/setup.bash (Important!) catkin_make source $HOME/ros/devel/setup.bash (2) Clone the example repo on github cd $HOME/ros/src git clone https://github.com/ATLFlight/snap_cam_ros.git git clone https://github.com/ATLFlight/snap_msgs.git cd snap_cam_ros (The "mirrored" directory on the host) git submodule init (Do this on the host) git submodule update  (Do this on the host) (3) Build cd $HOME/ros/ catkin_make -DCMAKE_BUILD_TYPE=Release -DQC_SOC_TARGET=APQ8096 install 2. Flight pro configuration (1) Archive the contents of prebuilt ROS folder on the development machine and push to the Flight Pro platform. tar -cvzf ros.tgz ros/ adb shell mkdir -p /home/username/ adb push ros.tgz /home/ username adb shell tar -xvzf /home/ user

Auto flight using a Qualcomm Snapdragon Flight platform (3) - WiFi mode switching

There are two WiFi mode available, they could be switched according to the following operations: 1. Access Point Mode Configuration(default): adb shell cd /data/misc/wifi/ vi wpa_supplicant.conf *SSID - QsoftAP *Password 1234567890 (psk) echo softap > wlan_mode Reboot 2. Station Mode Configuration: adb shell cd /data/misc/wifi/ vi wpa_supplicant.conf *Modify the wpa supplicant settings to match the WiFi network you wish to connect. echo station > wlan_mode Reboot *SSH over Wi-Fi: $ ssh root@<IP address of target> password: oelinux123

Auto flight using a Qualcomm Snapdragon Flight platform (2) - docker container

圖片
1. Install Docker on the host development machine [1], and then test the installation. (1) Check version docker version (2) Add user to docker group sudo groupadd docker sudo usermod -a -G docker {username} 2. Download Flight Pro Docker Image [2] 3. Import Flight Pro Docker Image docker load < excelsior-arm-sdk-sfpro_docker.tar docker images 4. Setup a Docker workspace cd $HOME  mkdir -p docker/flight_pro  cp ~/Downloads/run_docker.sh $HOME/docker/flight_pro  export SPRINT="null"  ./run_docker.sh atlflight/excelsior-arm-sdk-sfpro_docker   *This will launch you into a Docker bash shell running the same variant of Linux as the Flight Pro hardware as shown in the following picture. This script also creates a sdk_home directory in your docker workspace on your Host machine. Any changes you make within Docker $HOME will be mirrored to the sdk_home host workspace directory. 5. Build & test (1) download the SDKHelloWorld.zip from the  F

Auto flight using a Qualcomm Snapdragon Flight platform (1) - Installation

圖片
0. SD Card Recovery (1) Download the singleimage.bin recovery image and connect an 8Gb microSD card to your Linux box. (2) Determine the /dev/sd* device corresponding to your SD card. ex: fdisk -l (3) Flash the image to the SD card: sudo dd if=singleimage.bin of=<SD card device root> ex: sudo dd if=singleimage.bin of=/dev/sdb1 (4) Power down your Flight Pro hardware then insert the microSD into the SD Card slot and power it back on. 0. Install  ADB  and make sure it works ( a microusb cable is needed! ) (1) Installation apt-get install android-tools-adb android-tools-fastboot (2) Check (connect platform with a micro usb cable) adb devices adb shell 1. Upgrading the BSP (board support package) *Solution for the error message: insufficient permissions for device Add the following lines in jflash.sh file before modelIdApq=$( adb shell getprop ro.product.name | tr -d '[:space:]' ): sudo adb kill-server sudo adb start-server 2. I

maplab(1) - Installation and VIO mode

圖片
1. Install ROS 2. Install OpenCV [optional] * Installing libjasper-dev [4] * For OpenCV3.2: cmake -DCMAKE_BUILD_TYPE=Release -DCMAKE_INSTALL_PREFIX=/usr/local -DENABLE_PRECOMPILED_HEADERS=OFF -DOPENCV_GENERATE_PKGCONFIG=ON -DOPENCV_EXTRA_MODULES_PATH=../opencv_contrib-3.2.0/modules .. 3. Running ROVIOLI in VIO mode => A save folder with map information will be created as following picture. 4. Map management (1) rosrun maplab_console maplab_console (2) load --map_folder <path/to/the/save_folder> (3) v *select --map_key my_empty_map: select the load map you want. 5. Inspecting and visualizing a map (1) rosrun rviz rviz (2) Add data source in rviz:  Marker from /vi_map_edges/viwls , PointCloud2 from vi_map_landmarks . *Modify the CMakeLists.txt file in the opencv3_catkin folder is suggested if you use the virtual machine for development. (make -j8 -> make -j2) *Adjust the bigger amount of memory is also recommended [5], or you will see the c